Monday, 3 October 2011

Tarte au citron

Hello, 


Another long delay between blogging but I am trying to improve and possibly more importantly - trying to remember to write down what I do/cook/learn rather than just drink it all in without a second thought for the joys of the world wide web. 


So - Tarte au Citron or as I like to call it Lemon tart - home made lemon curd piled into a homemade short crust pastry case and topped with candied lemons. 


Now credit where credit is due the inspiration behind this post is one of the Guardian newspapers best food writers. She is called Felicity Cloake and has the enviable job of researching, cooking and most importantly tasting some of the best food on the planet. 


The recipe! [based on the one by Felicity Cloake but with a few tweaks]


For the pastry:
180g plain flour
90g caster sugar
90g unsalted butter, diced or margarine
Cold water - enough till it binds into a workable ball
Zest of a lemon
For the filling:
4 unwaxed lemons
275g caster sugar
4 eggs, beaten 
300g unsalted butter
1. To make the pastry, put the flour, lemon zest and sugar in a food processor and pulse briefly to mix. Add the diced butter and pulse until well combined. With the motor running, add the water and continue to mix until it comes together into a dough. Remove, shape into a disc, wrap in clingfilm and chill for about an hour, until pliable but not sticky to the touch.
2. Preheat the oven to 190C. Roll out the pastry until about ½cm thick, and use to line a greased 22cm fluted tart tin. Line with greaseproof paper and baking beans, and blind bake for about 15 minutes until golden, then remove the paper and beans and brush the base with egg white. Put back in the oven for another 8 minutes, then remove and turn off the oven. (This acts as a varnish and stops all out war between a dry pastry base and a very wet lemon curd resulting in soggy pastry)
3. To make the filling, finely zest the lemons into a heatproof bowl, add 225g caster sugar and rub together with your fingers. Stir in the eggs and the juice of 3½ lemons, and then set the bowl over a pan of simmering water, making sure it doesn't touch the water. Heat, whisking gently but continuously, until it thickens to the texture of lemon curd: this should take about 20 minutes. Remove from the heat, leaving the pan where it is, and allow to cool for 10 minutes, then stir in the butter and process with a blender until smooth. Scoop into the tart case, smooth the top and allow to cool completely.
4. Meanwhile, cut the remaining lemon into thin slices and remove the pips. Soften in the pan of simmering water for 10 minutes. Dissolve the remaining 50g sugar in 50ml water in a wide pan, and bring to the boil. Add the lemon slices and simmer for 10 minutes or until the lemon slices change from yellow to a syrupy gold (you may need to add more water. Make sure you only candy your lemon slices when everything else is ready otherwise they cool and stick to anything - bottom of pans, work surfaces, you etc), then remove with a slotted spoon and arrange on top of the tart. Brush with the remaining syrup, and allow to set before serving.
Thanks for reading! 


Jon

Tuesday, 5 July 2011

NEW BLOG: Bread Making

Hello! 


My apologies for the stupidly long gap between posts - I hope to post a lot more in the next couple of weeks - I'm still getting used to writing/remembering to take photos for these blogs...


Anyway - BREAD!


The basic recipe:


500g of bread flour - 1/2 and 1/2 of normal and extra strong
Pinch of salt 
7g packet of yeast - you can use fresh stuff - it doesn't make a blind bit of difference in my opinion
350ml of warm water - I use 100ml of boiling water topped up with 250 ml of cold


Change the types of flour round if you want a wholemeal loaf, add 2tbsp of olive oil to get a bread that tastes like focaccia, when your put your glaze on (later on!) sprinkle poppy seeds/spices/salt/oats for lots of different flavours of bread. 


If your using a bread maker just chuck all these ingredients in and press the buttons that say "slow bake" or "rustic" and "french style". You will get lovely bread without any fuss. If however you don't own/want to use a breadmaker heres the slightly more complicated but equally as satisfying way to make bread. 


Step 1 - Ingredients & Mixing


The ingredients  as listed above - dont let your salt and yeast mix until you start mixing them together with your water otherwise the salt attacks the yeast and you don't get as good a rise! 


350ml is the basic amount of water to start out with - if your mix is to wet gradually add a little flour, if its to dry and doesn't bind together slowly add a little water. 

I use a powered mixer to combine my ingredients (dry & wet) but a wooden spoon and a little hard work also does the trick. After a few minutes of mixing your ingredients should start to look like this. 

At this stage you can start to knead your dough - don't worry if it looks sticky - you can sprinkle flour on your work surface or for the brave people amongst you just keep kneading (pushing away from you/ folding back on itself etc) it and by the magic of baking it will stop being sticky and become more manageable dough. 

Once your dough has been throughly mixed and kneaded and can be poked and spring back into shape its ready for rising. 


Always put your dough in a clean bowl for rising - not the one you mixed in - otherwise unmixed ingredients can be combined and your dough wont be as nice. I always measure my dry ingredients into the bowl I'm going to rise my dough. None of the dry ingredients stay in the bowl except a tiny amount of flour which is used as a non stick device for when you come to get your risen dough out of the bowl.

The rise 


When I leave my bread to rise I always place it above a half filled pan of boiling water in a plastic mixing bowl with a lid till its doubled in size (40 minutes to an hour). You can control the temperature so the dough doesn't expand to quickly and it doesn't take up space in a cupboard (where it can be forgotten). If its a sunny day outside just leave the dough in the mixing bowl (with lid!) in a sunny spot for an hour and it will have doubled in size.


Dough doubled in size!


 When your dough has risen remove it from the mixing bowl and knead it again on a lightly floured surface and then shape it however you want. Their are hundreds of tips on how to shape bread, probably vast quantities of the internet dedicated to the very subjects - feel free to read it all if you want. The basic shape is easy - choose a shape you want - bloomer, round or whatever and gently shape your dough that way - remember your dough will expand whilst your oven warms up and again whilst its cooking - so don't do anything to fancy. 

After the dough has been shaped put it on a baking tray that has been rubbed with olive oil and sprinkled with a little flour (this stops it sticking and being impossible to remove from the tray without committing bread murder) and leave it to rise again over the same pan boiling water or sunny spot - this time with just a tea towel over the top. 

When you have done this pre heat your oven to gas mark 7 and let it warm up for 1/2 an hour. Also make sure the middle of your oven it free of oven shelves so that your bread has room to grow during its cooking.


After another 1/2 hour your bread should have doubled in size again - if it hasn't add some more boiling water to the pan it is rising over and leave it for 15 minutes and it will have doubled in size.

Decoration


No need for fancy stuff here. Score your bread with a sharp knife in whatever pattern you want. 

For the glaze plain old cold water gently rubbed over all your dough will make it come out perfectly golden brown. 

Finally place it in the middle of your oven and cook it for around 35 minutes - to check its done pick your bread up and tap the bottom - if theirs a hollow sound your done, if not leave it in for a bit longer so the middle can cook right through!


Please feel free to ask questions! 

This method is based on the way I make a basic loaf and if some steps seem a little confusing its probably because I've not explained a step that I do without thinking about it!

Thanks 

Jon


Sunday, 5 June 2011

NEW BLOG:The Crisp Butty RECIPE

Hello! 


So I thought I havn't actually posted a recipe in a while and I couldn't decide what to make. After a fairly short time looking at my recipe books I decided to for a classic - The Crisp Butty (yes it needs capitals, no its not a sandwich)


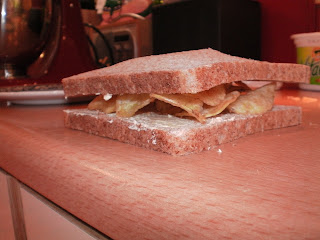
First things first the ingredients! Alright so maybe not ingredients per say more components to the perfect crisp butty - as we know each crisp butty is unique to its maker. Anyway moving on - components for one of the best snacks in the world. First the bread - I use 2 slices of wholemeal bread, yes yes I know brown bread instead of white bread - each to their own please. Next up is the spread - the main of this is to provide the perfect cohesive layer between bread and crisp so you don't have to face the horror of horrors that is crisp loss. I use Vitalite mainly because I like it and its always in the fridge - if you want to use butter go ahead but I would suggest don't use too much otherwise you end up with a bread and butter butty with a few lost crisps lost in their. 


Finally the most important part - 
THE CRISPS!
These must be proper crunchy crisps because a crispbutty is just not a crisp butty without substantial crisps supporting it. I use seasalt Kettle Crisps - expensive but worth it.  So ok - bread, spread and crisps - do whatever you want as long as you end up with a butty your happy with thats all that matters. Next onto the tools you will need - a knife (for spreading and if your feeling posh cutting completed butty into as many pieces as you want) and a plate for transporting completed butty to wherever you want to eat it. 


Excellent - still with me? Cool. Onto the spreading - again its a case of whatever makes you happy. I go for a comprehensively yet lightly covered 2 sided approach. In other words don't put too much Vitalite on but make sure that you do both sides of your bread and make sure that it goes all over the bread - including the corners - this annoys me so much when people don't spread to the corners! This means that when you put your crisps on they stick and you wont lose a single one. 


Right so the stacking of the crisps onto the bread - guess what? Its another case of whatever makes you happy! I've gone for the "too many crisps but I just don't care I'll just stack them as high as humanly possibly and crush them back into the butty when I put the top on" approach. Its also really good to stack crisps like this instead of just doing one so that you don't different amounts of crisps with each mouthful (If you hadn't realised by now yes I do spend too much time thinking about recipes/cooking/food but I'm happy so I don't care)


So moving swiftly onto one of the most important parts on your journey towards snack nirvana - the application of the second slice of bread or as I like to call it - THE CRUSH!!! Ok so that was a lie I don't call it that but I may start doing so from now on. This is just a backup measure to support the Vitalite in making sure that your crisps stay on your butty and you don't lose any of the crunchy goodness. Right folks - if your impatient and havn't bothered with a plate your at the end of the blog - pick up your completed butty and enjoy one of if not the best snacks in the world. If however you want to transport your creation with you......


...stick it on a plate and your good to go. 


If someone from Kettle or Vitalite read this I'm not nicking your names for my own benefit in any form whatsoever just saying they are essential parts to my version of crispy butty! 


Thanks for reading guys! 


Jon 

Tuesday, 31 May 2011

NEW BLOG: Bank Holiday Weekend

Hello! 


So took an extra few days off and turned my bank holiday weekend into 5 days instead of 3. Didn't really have a plan as to what to do except do things on the spur of the moment or just relax - in the end I did both - mwhaha. 


Wednesday night - made this:


Tomato, basil and rosemary focaccia bread


Yum. Recipe and video how to should follow next time I make this. 


Thursday as you've already read included a trip to West Kirby - apparently home to one of the UK's best beaches. I'll admit it was a very nice beach - the wind and rain not nice - but no complaint about the sand that ended up in my trainers and spread around the majority of my car. 


Looking out from West Kirby beach before we started to freeze. 


Friday was a fairly chilled out day. I walked to the shop  instead of driving. This may not seem a big thing but I'm sorry to say that since I've started driving the amount of walking I do has been declined by a scary amount! Also spent far too long playing God with the new wireless printer.  Finished the day off with a trip to Daresbury labs - the do a free lecture every month and they are usually really interesting. This months was done by some bloke who spent most of his life in the Antarctic circle and was terrified that his research station was going to float away and the rest of the world will flood. Fun times. 


Finished off the day with mac n cheese and cider. I'll post a recipe for this with a video next time I make it. 


Saturday arrived and we decided to take a stroll round Dunham Massey deer park. Its good -you should go there - they have deer 


and cake


Good day. 

Sunday rolled round - why does time off speed past so fast? Yes I know that rhymes. No I didn't type it like that deliberately. Am I going to leave it? Yes. Do I feel overly impressed with myself right now? Damn right! Again with mwhahaha. 

Anyway - Sunday! We went to Speke Hall - it was a really cool place but slightly confusing as for some reason they had decided to put Liverpool John Lennon Airport right next door. This meant the lovely relaxing strolling around was punctuated by a massive EasyJet plane going over at 300ft overy 45 minutes or so. 

Anyway - some photos

My friend hiding behind a hedge to avoid having his photo taken

Speke Hall - Jeff the overly friendly and quite terrifying garden guide said we must take this photo of the house  or  we would die!!! I may have made that last bit up - if you've been greeted by Jeff you understand.

I'm typing this bit in on the final read through before I hit post (even though I do this I know that I will have missed about 8 million mistakes - sorry - I'm rubbish at proof reading :)) - the National Trust have this new scheme where they let you have a more "interactive" experience - sounds odd? I thought so too until I walked into one room and the guide asked if we would like to have a go at playing billiards on the massive table they had. Sadly no pictures as weren't allowed to take them in the house and we couldn't take one on the quiet as we were too distracted playing billiards :P

Decided to unleash my inner photo geek at this point and try and do a panoramic shot with my new camera - here is the result: 


3 pictures stitched together. 

So Monday rolls around far too quickly and whats the worst you could do on a bank holiday Monday? Nope! Its try and park at Ikea Warrington - I have never seen a war zone with so much flatpack flying everywhere - it was quite terrifying. 

Sorry - no pictures for Monday. I did cook a roast dinner so recipes and videos to follow! 

Thanks for reading

Jon. 


Friday, 27 May 2011

NEW BLOG: Sweet Pea Cafe West Kirby

Hello, 


No recipe just today just a recommendation for a good place to eat! 


Decided to go to the beach in West Kirby and found a fantastic beach but also bucketfuls of wind and rain. We went on a hunt for somewhere to wait to warm up and found The Sweet Pea cafe on Acacia Grove just in the centre of West Kirby. 


Its a mix of traditional English - lots of different butties served on white/brown or in baguettes with any combination of fillings you can think of - including fish fingers. All served by friendly and helpful staff in a small but interesting building (see photo)


We ate: Olives, flatbread, homemade houmous,  and chips (you have to have chips at the seaside - it just has to be done.)


We drank: Hot chocolate and Water


Total: 10.90


This is the size of the whole cafe - space for around 20 people seated on tables for groups of 2 or 4 people. 


Thanks for reading! 

Jon

Tuesday, 17 May 2011

Easy Double Choc Chip cookies


Hello everyone, 

So decided to make of my favourite recipes tonight just because I could. 
Apologies for the lack of video and pictures. They are prepared so 
quickly that I didn't have time to think to pick up my camera and eaten so 
fast that their was nothing left to take a photo of!

Thanks 

Jon

Ingredients

Preparation method

  1. Preheat the oven to 200C/400F/Gas 6.
  2. Place the butter and the caster sugar into a bowl and beat together until light and creamy.
  3. Add the sunflower oil and brown sugar and fold through to combine.
  4. Add the egg and vanilla essence and mix well.
  5. In a separate bowl, mix together the flour, salt and baking powder.
  6. Add the flour mixture to the butter and sugar mixture and mix well to form a dough.
  7. Fold in the white and milk chocolate pieces.
  8. On a floured work surface, carefully roll out the dough to 1cm/½in thick.
  9. Using the cookie cutter of your choice, cut out 8-16 cookies (depending on the size of the cutter - I try and aim for a circle shape thats about 10cm across - this means they dont spread too much when baked.)
  10. Place the cookies onto a greased baking tray (not to close together as they will spread). Place into the oven to bake for 15 minutes, or until golden-brown and cooked through.
  11. Remove from the oven and leave to cool on the trays for 8-10 minutes, then transfer to a wire cooling rack to cool completely. Then stick them in an airtight container so that they remain soft and chewy instead of trying to break your teeth!